%swig -python example.i
This will produce 2 files. The file example_wrap.c contains all of the C code needed to build a Python module and a documentation file describes the resulting interface. To build a Python module, you will need to compile the file example_wrap.c and link it with the rest of your program (and possibly Python itself). When working with shadow classes, SWIG will also produce a .py file, but this is described later.
For Python 1.3 :
/usr/local/include/Py
/usr/local/lib/python/lib
For Python 1.4 :
The exact location may vary on your machine, but the above locations are typical./usr/local/include/python1.4 /usr/local/lib/python1.4/config
Unfortunately, the process of building a shared object file varies on every single machine so you may need to read up on the man pages for your C compiler and linker.% swig -python example.i % gcc -c example.c % gcc -c example_wrap.c -DHAVE_CONFIG_H -I/usr/local/include/python1.4 \ -I/usr/local/lib/python1.4/config % ld -shared example.o example_wrap.o -o examplemodule.so
When building a dynamic module, the name of the output file is important. If the name of your SWIG module is "example", the name of the corresponding object file should be "examplemodule.so" (or equivalent depending on your machine). The name of the module is specified using the %module directive or -module command line option.
While dynamic loading is the preferred method for making SWIG modules, it is not foolproof and not supported on all machines. In these cases, you can rebuild the Python interpreter with your extensions added.
SWIG provides an extremely easy, although somewhat unconventional, mechanism for rebuilding Python using SWIG's library feature. When you want to build a static version of Python, simply make an interface file like this :
The embed.i library file includes supporting code that contains everything needed to rebuild Python. To build your module, simply do the following :%module example extern int fact(int); extern int mod(int, int); extern double My_variable; %include embed.i // Include code for a static version of Python
On some machines, you may need need to supply additional libraries on the link line. In particular, you may need to supply -lsocket, -lnsl, and -ldl.% swig -python example.i % gcc example.c example_wrap.c -DHAVE_CONFIG_H -I/usr/local/include/python1.4 \ -I/usr/local/lib/python1.4/config \ -L/usr/local/lib/python1.4/config -lModules -lPython -lObjects -lParser -lm \ -o mypython
It is also possible to add the embed.i library to an existing interface by running SWIG as follows :
The embed.i file uses all of the modules that are currently being used in your installed version of Python. Thus, your new version of Python will be identical to the old one except with your new module added. If you have configured Python to use modules such as tkinter, you may need to supply linkage to the Tcl/Tk libraries and X11 libraries.% swig -python -lembed.i example.i
Python's main() program is rather unfriendly towards C++ code, but SWIG's embed.i module provides a replacement that can be compiled with the C++ compiler--making it easy to build C++ Python extensions.
The embed.i library should only be used with Python 1.4. If you are using Python 1.3, you should use the file embed13.i instead (this can be done by making a symbolic link in the SWIG library) or simply using the -l option.
% python
>>> import example
>>> example.fact(4)
24
>>>
Now, assuming all went well, SWIG will be automatically invoked when you build your project. Any changes made to the interface file will result in SWIG being automatically invoked to produce a new version of the wrapper file. To run your new Python extension, simply run Python and use the import command as normal. For example :
MSDOS > python
>>> import example
>>> print example.fact(4)
24
>>>
# Makefile for building a Python extension

SRCS          = example.c
IFILE         = example
INTERFACE     = $(IFILE).i
WRAPFILE      = $(IFILE)_wrap.c

# Location of the Visual C++ tools (32 bit assumed)

TOOLS         = c:\msdev
TARGET        = example.dll
CC            = $(TOOLS)\bin\cl.exe
LINK          = $(TOOLS)\bin\link.exe
INCLUDE32     = -I$(TOOLS)\include
MACHINE       = IX86

# C Library needed to build a DLL

DLLIBC        = msvcrt.lib oldnames.lib

# Windows libraries that are apparently needed
WINLIB        = kernel32.lib advapi32.lib user32.lib gdi32.lib comdlg32.lib
winspool.lib

# Libraries common to all DLLs
LIBS          = $(DLLIBC) $(WINLIB)

# Linker options
LOPT      = -debug:full -debugtype:cv /NODEFAULTLIB /RELEASE /NOLOGO \
             /MACHINE:$(MACHINE) -entry:_DllMainCRTStartup@12 -dll

# C compiler flags

CFLAGS        = /Z7 /Od /c /nologo
PY_INCLUDE    = -Id:\python-1.4\Include -Id:\python-1.4 -Id:\python-1.4\Pc
PY_LIB        = d:\python-1.4\vc40\python14.lib
PY_FLAGS = /D__WIN32__

python::
	swig -python -o $(WRAPFILE) $(INTERFACE)
	$(CC) $(CFLAGS) $(PY_FLAGS) $(PY_INCLUDE) $(SRCS) $(WRAPFILE)
	set LIB=$(TOOLS)\lib
	$(LINK) $(LOPT) -out:example.dll $(LIBS) $(PY_LIB) example.obj example_wrap.obj
To build the extension, run NMAKE (you may need to run vcvars32 first). This is a pretty simplistic Makefile, but hopefully its enough to get you started.
gets turned into the Python function example.fact(n) :%module example extern int fact(int n);
>>> import example
>>> print example.fact(4)
24
>>>
"a" becomes a name for an object containing the value 3.4. If you later typea = 3.4
Then "a" and "b" are both names for the object containing the value 3.4. In other words, there is only one object containing 3.4 and "a" and "b" are both names that refer to it. This is a very different model than that used in C. For this reason, there is no mechanism for mapping "assignment" in Python onto C global variables (because assignment is Python is really a naming operation).b = a
To provide access to C global variables, SWIG creates a special Python object called `cvar' that is added to each SWIG generated module. This object is used to access global variables as follows :
// SWIG interface file with global variables
%module example
...
extern int My_variable;
extern double density;
...
Now in Python :
>>> import example
>>> # Print out value of a C global variable
>>> print example.cvar.My_variable
4
>>> # Set the value of a C global variable
>>> example.cvar.density = 0.8442
>>> # Use in a math operation
>>> example.cvar.density = example.cvar.density*1.10
Just remember, all C globals need to be prefixed with a "cvar." and you will be set. If you would like to use a name other than "cvar", it can be changed using the -globals option :
Some care is in order when importing multiple SWIG modules. If you use the "from <file> import *" style of importing, you will get a name clash on the variable `cvar' and will only be able to access global variables from the last module loaded. SWIG does not create cvar if there are no global variables in a module.% swig -python -globals myvar example.i
A NULL pointer is represented by the string "NULL". You can also explicitly create a NULL pointer consisting of the value 0 and a type such as :_100f8e2_Vector_p
To some Python users, the idea of representing pointers as strings may seem strange, but keep in mind that pointers are meant to be opaque objects. In practice, you may never notice that pointers are character strings. There is also a certain efficiency in using this representation as it is easy to pass pointers around between modules and it is unnecessary to rely on a new Python datatype. Eventually, pointers may be represented as special Python objects, but the string representation works remarkably well so there has been little need to replace it._0_Vector_p
struct Vector {
	double x,y,z;
};
These functions are then used in the resulting Python interface. For example :double Vector_x_get(Vector *obj) double Vector_x_set(Vector *obj, double x) double Vector_y_get(Vector *obj) double Vector_y_set(Vector *obj, double y) double Vector_z_get(Vector *obj) double Vector_z_set(Vector *obj, double z)
# v is a Vector that got created somehow
>>> Vector_x_get(v)
3.5
>>> Vector_x_set(v,7.8)       # Change x component
>>> print Vector_x_get(v), Vector_y_get(v), Vector_z_get(v)
7.8 -4.5 0.0
>>>
Similar access is provided for unions and the data members of C++ classes.
class List {
public:
  List();
  ~List();
  int  search(char *item);
  void insert(char *item);
  void remove(char *item);
  char *get(int n);
  int  length;
static void print(List *l);
};
When wrapped by SWIG, the following functions will be created :
Within Python, these functions used to access the C++ class :List *new_List(); void delete_List(List *l); int List_search(List *l, char *item); void List_insert(List *l, char *item); void List_remove(List *l, char *item); char *List_get(List *l, int n); int List_length_get(List *l); int List_length_set(List *l, int n); void List_print(List *l);
C++ objects are really just pointers. Member functions and data are accessed by simply passing a pointer into a collection of accessor functions that take the pointer as the first argument.>>> l = new_List() >>> List_insert(l,"Ale") >>> List_insert(l,"Stout") >>> List_insert(l,"Lager") >>> List_print(l) Lager Stout Ale >>> print List_length_get(l) 3 >>> print l _1008560_List_p >>>
While somewhat primitive, the low-level SWIG interface provides direct and flexible access to C++ objects. As it turns out, a more elegant method of accessing structures and classes is available using shadow classes.
class List:
	def __init__(self):
		self.this = new_List()
	def __del__(self):
		delete_List(self.this)
	def search(self,item):
		return List_search(self.this,item)
	def insert(self,item):
		List_insert(self.this,item)
	def remove(self,item):
		List_remove(self.this,item)
	def get(self,n):
		return List_get(self.this,n)
	def __getattr__(self,name):
		if name == "length" : return List_length_get(self.this))
		else : return self.__dict__[name]
	def __setattr__(self,name,value):
		if name == "length": List_length_set(self.this,value)
		else : self.__dict__[name] = value
When used in a Python script, we can use the class as follows :
>>> l = List()
>>> l.insert("Ale")
>>> l.insert("Stout")
>>> l.insert("Lager")
>>> List_print(l.this)
Lager
Stout
Ale
>>> l.length
3
Obviously, this is a much nicer interface than before--and it only required a small amount of Python coding.
By writing shadow classes in Python instead of C, the classes become real Python classes that can be used as base-classes in an inheritance hierarchy or for other applications. Writing the shadow classes in Python also greatly simplies coding complexity as writing in Python is much easier than trying to accomplish the same thing in C. Finally, by writing shadow classes in Python, they are easy to modify and can be changed without ever recompiling any of the C code. The downside to this approach is worse performance--a concern for some users.
The problems of combining C++ and Python have been of great interest to the Python community. SWIG is primarily concerned with accessing C++ from Python. Readers who are interested in more than this (and the idea of accessing Python classes from C++) are encouraged to look into the MESS extension which aims to provide a tighter integration between C++ and Python. The recently announced GRAD package also shows much promise and provides very comprehensive C++/Python interface.
This will create the following two files :swig -python -shadow interface.i
interface_wrap.c
module.py
The file interface_wrap.c contains the normal SWIG C/C++ wrappers. The file module.py contains the Python code corresponding to shadow classes. The name of this file will be the same as specified by the %module directive in the SWIG interface file.
Associated with the two files are TWO Python modules. The C module `modulec' contains the low-level C interface that would have been created without the -shadow option. The Python module `module' contains the Python shadow classes that have been built around the low-level interface. To use the module, simply use `import module'. For all practical purposes, the `modulec' module is completely hidden although you can certainly use it if you want to.
might be compiled as follows :%module example ... a bunch of declarations ...
Notice the naming of `examplecmodule.so' as opposed to `examplemodule.so' that would have been created without shadow classes.% swig -python -shadow example.i % gcc -c example.c example_wrap.c -I/usr/local/include/python1.4 \ -I/usr/local/lib/python1.4/config -DHAVE_CONFIG_H % ld -shared example.o example_wrap.o -o examplecmodule.so
When using static linking, no changes need to be made to the compilation process.
// File : pde.h
// Header file for Heat equation solver

#include <math.h>
#include <stdio.h>

// A simple 2D Grid structure

// A simple structure for holding a 2D grid of values
struct Grid2d {
  Grid2d(int ni, int nj);
  ~Grid2d();
  double **data;
  int      xpoints;
  int      ypoints;
};

// Simple class for solving a heat equation */
class Heat2d {
private:
  Grid2d    *work;                         // Temporary grid, needed for solver
  double    h,k;                           // Grid spacing
public:
  Heat2d(int ni, int nj);
  ~Heat2d();
  Grid2d    *grid;                         // Data
  double     dt;                           // Timestep
  double     time;                         // Elapsed time
  void       solve(int nsteps);            // Run for nsteps
  void       set_temp(double temp);        // Set temperature
};
The supporting C++ code implements a simple partial differential equation solver and some operations on the grid data structure. The precise implementation isn't important here, but all of the code can be found in the "Examples/python/manual" directory of the SWIG distribution.
// File : pde.i
%module pde
%{
#include "pde.h"
%}

%include pde.h
To build the module simply run SWIG with the following options
swig -python -shadow pde.i
and compile using the techniques described in the beginning of this chapter.
# A fairly uninteresting example

from pde import *

h = Heat2d(50,50)          # Creates a new "problem"

h.set_temp(1.0)
print "Dt = ", h.dt

# Solve something

for i in range(0,25):
	h.solve(100)
	print "time = ", h.time
When run, we get rather exciting output such as the following :
(okay, it's not that exciting--well, maybe it is if you don't get out much).Dt = 2.5e-05 time = 0.0025 time = 0.005 time = 0.0075 ... time = 0.06 time = 0.0625
While this has only been a simple example it is important to note that we could have just as easily written the same thing in C++. For example :
// Python example written in C++

#include "pde.h"
#include <stdio.h>

int main(int argc, char **argv) {

  Heat2d *h;

  h = new Heat2d(50,50);
  printf("Dt = %g\n", h->dt);

  h->set_temp(1.0);

  for (int i = 0; i < 25; i++) {
    h->solve(100);
    printf("time = %g\n", h->time);
  }
}
Unfortunately, our Python version suffers a number of drawbacks. Most notably, there is no way for us to access any of the grid data (which is easily accomplished in C++). However, there are ways to fix this :
%module pde
%{
#include "pde.h"
%}

%include pde.h

// Add a few "helper" functions to extract grid data
%inline %{
double  Grid2d_get(Grid2d *g, int i, int j) {
      return g->data[i][j];
}
void    Grid2d_set(Grid2d *g, int i, int j, double val) {
      g->data[i][j] = val;
}
%}
We can now use our accessor functions to write a more sophisticated Python script :
# An example using our set/get functions

from pde import *

# Set up an initial condition
def initcond(h):
	h.set_temp(0.0)
	nx = h.grid.xpoints
	for i in range(0,nx):
		Grid2d_set(h.grid,i,0,1.0)                        # Set grid values

# Dump out to a file
def dump(h,filename):
	f = open(filename,"w")
	nx = h.grid.xpoints
	ny = h.grid.ypoints
	for i in range(0,nx):
		for j in range(0,ny):
			f.write(str(Grid2d_get(h.grid,i,j))+"\n")  # Get grid value
	f.close()

# Set up a problem and run it

h = Heat2d(50,50)
initcond(h)
fileno = 1
for i in range(0,25):
	h.solve(100)
	dump(h,"Dat"+str(fileno))
	print "time = ", h.time
	fileno = fileno+1
We now have a Python script that can create a grid, set up an initial condition, run a simulation, and dump a collection of datafiles. So, with just a little supporting code in our interface file, we can start to do useful work from Python.
void dump(Heat2d *h, char *filename) {
      FILE *f;
      int   i,j;

      f = fopen(filename,"w");
      for (i = 0; i < h->grid->xpoints; i++)
	for (j = 0; j < h->grid->ypoints; j++)
	  fprintf(f,"%0.17f\n",h->grid->data[i][j]);
      fclose(f);
}
To use this new function, simple put its declaration in the SWIG interface file and get rid of the old Python version. The Python script won't know that you changed the implementation.
Grid2d_set(grid,i,j,1.0)
It might make more sense to make the get/set functions appear like member functions of the Grid2D class. That way we could use them like this :
SWIG provides a simple technique for doing this as illustrated in the following interface file :grid.set(i,j,1.0) grid.get(i,j)
%module pde
%{
#include "pde.h"
%}
%include pde.h

// Add a few "helper" functions to extract grid data
%{
    double  Grid2d_get(Grid2d *g, int i, int j) {
      return g->data[i][j];
    }
    void    Grid2d_set(Grid2d *g, int i, int j, double val) {
      g->data[i][j] = val;
    }
%}

// Now add these helper functions as methods of Grid2d

%addmethods Grid2d {
    double get(int i, int j);              // Gets expanded to Grid2d_get()
    void   set(int i, int j, double val);  // Gets expanded to Grid2d_set()
}
The %addmethods directive tells SWIG that you want to add new functions to an existing C++ class or C structure for the purposes of building an interface. In reality, SWIG leaves the original C++ class unchanged, but the resulting Python interface will have some new functions that appear to be class members.
SWIG uses a naming convention for adding methods to a class. If you have a class Foo and you add a member function bar(args), SWIG will look for a function called Foo_bar(this,args) that implements the desired functionality. You can write this function yourself, as in the previous interface file, but you can also just supply the code immediately after a declaration like this :
%module pde
%{
#include "pde.h"
%}
%include pde.h

// Add some new accessor methods to the Grid2D class
%addmethods Grid2d {
  double get(int i, int j) {
    return self->data[i][j];
  };
  void set(int i, int j, double val) {
    self->data[i][j] = val;
  };
};
In this case, SWIG will take the supplied code, and automatically generate a function for the method. The special variable "self" is used to hold a pointer to the corresponding object. The self pointer is exactly like the C++ "this" pointer, except that the name has been changed in order to remind you that you aren't really writing a real class member function. (Actually, the real reason we can't use "this" is because the C++ compiler will start complaining!)
Finally, it is worth noting that the %addmethods directive may also be used inside a class definition like this :
struct Grid2d {
  Grid2d(int ni, int nj);
  ~Grid2d();
  double **data;
  int      xpoints;
  int      ypoints;
  %addmethods {
	double get(int i, int j);
	void   set(int i, int j, double value);
  }
};
Okay, enough talk. By adding the set/get functions as methods, we can now change our Python script to look like this (changes are underlined) :
# An example using our new set/get functions

from pde import *

# Set up an initial condition

def initcond(h):
	h.set_temp(0.0)
	nx = h.grid.xpoints
	for i in range(0,nx):
		h.grid.set(i,0,1.0)         # Note changed interface

# Dump out to a file
def dump(h,filename):
	f = open(filename,"w")
	nx = h.grid.xpoints
	ny = h.grid.ypoints
	for i in range(0,nx):
		for j in range(0,ny):
			f.write(str(h.grid.get(i,j))+"\n")
	f.close()

# Set up a problem and run it

h = Heat2d(50,50)
initcond(h)
fileno = 1

for i in range(0,25):
	h.solve(100)
	h.dump("Dat"+str(fileno))
	print "time = ", h.time
	fileno = fileno+1
Now it's starting to look a little better, but we can do even better...
// SWIG interface file with Python array methods added
%module pde
%{
#include "pde.h"
%}

%include pde.h

%inline %{
  // Define a new Grid2d row class
  struct Grid2dRow {
    Grid2d *g;       // Grid
    int    row;      // Row number
    // These functions are used by Python to access sequence types (lists, tuples, ...)
    double __getitem__(int i) {
      return g->data[row][i];
    };
    void __setitem__(int i, double val) {
      g->data[row][i] = val;
    };
  };
%}

// Now add a __getitem__ method to Grid2D to return a row
%addmethods Grid2d {
  Grid2dRow __getitem__(int i) {
    Grid2dRow r;
    r.g = self;
    r.row = i;
    return r;
  };
};
We have now replaced our get/set functions with the __getitem__ and __setitem__ functions that Python needs to access arrays. We have also added a special Grid2dRow class. This is needed to allow us to make a funny kind of "multidimensional" array in Python (this may take a few minutes of thought to figure out). Using this new interface file, we can now write a Python script like this :
# An example script using our array access functions

from pde import *

# Set up an initial condition

def initcond(h):
	h.set_temp(0.0)
	nx = h.grid.xpoints
	for i in range(0,nx):
		h.grid[i][0] = 1.0            # Note nice array access

# Set up a problem and run it

h = Heat2d(50,50)
initcond(h)
fileno = 1

for i in range(0,25):
	h.solve(100)
	h.dump("Dat"+str(fileno))
	print "time = ", h.time
	fileno = fileno+1

# Calculate average temperature over the region

sum = 0.0
for i in range(0,h.grid.xpoints):
	for j in range(0,h.grid.ypoints):
		sum = sum + h.grid[i][j]        # Note nice array access

avg = sum/(h.grid.xpoints*h.grid.ypoints)

print "Avg temperature = ",avg
To make a module, you can use the following checklist :
In the case of the gd library, we can simply use the following SWIG interface file :
%module gd
%{
#include "gd.h"
%}

%section "gd-1.2",ignore
%include "gd.h"

// These will come in handy later
FILE *fopen(char *, char *);
void fclose(FILE *f);
In this file, we first tell SWIG to put all of the gd functions in a separate documentation section and to ignore all comments. This usually helps clean up the documentation when working with raw header files. Next, we simply include the contents of "gd.h" directly. Finally, we provide wrappers to fopen() and fclose() since these will come in handy in our Python interface.
If we give this interface file to SWIG, we will get the following output :
While SWIG was able to handle most of the header file, it also ran into a few unsupported declarations---in this case, a few data structures with array members. However, the warning messages also tell us that these declarations have simply been ignored. Thus, we can choose to continue and build our interface anyways. As it turns out in this case, the ignored declarations are of little or no consequence so we can ignore the warnings.% swig -python -shadow -I/usr/local/include gd.i Generating wrappers for Python /usr/local/include/gd.h : Line 32. Arrays not currently supported (ignored). /usr/local/include/gd.h : Line 33. Arrays not currently supported (ignored). /usr/local/include/gd.h : Line 34. Arrays not currently supported (ignored). /usr/local/include/gd.h : Line 35. Arrays not currently supported (ignored). /usr/local/include/gd.h : Line 41. Arrays not currently supported (ignored). /usr/local/include/gd.h : Line 42. Arrays not currently supported (ignored). %
If SWIG is unable to process a raw header file or if you would like to eliminate the warning messages, you can structure your interface file as follows :
%module gd
%{
#include "gd.h"
%}

%section "gd-1.2",ignore

... paste the contents of gd.h here and remove problems ...

// A few extra support functions

FILE *fopen(char *, char *);
void fclose(FILE *f);
# Simple gd program

from gd import *

im = gdImageCreate(64,64)
black = gdImageColorAllocate(im,0,0,0)
white = gdImageColorAllocate(im,255,255,255)
gdImageLine(im,0,0,63,63,white)
out = fopen("test.gif","w")
gdImageGif(im,out)
fclose(out)
gdImageDestroy(im)
That was simple enough--and it only required about 5 minutes of work. Unfortunately, our gd module still has a few problems...
The gdImagePtr type is created by another function in our module and the parameters pointsTotal and color are simple integers. However, the 2nd argument is a pointer to an array of points as defined by the following data structure in the gd-1.2 header file :void gdImagePolygon(gdImagePtr im, gdPointPtr points, int pointsTotal, int color);
typedef struct {
	int x, y;
} gdPoint, *gdPointPtr;
%module gd
%{
#include "gd.h"
%}

%include "gd.h"

// Fix up the gdPoint structure a little bit
%addmethods gdPoint {
  // Constructor to make an array of "Points"
  gdPoint(int npoints) {
    return (gdPoint *) malloc(npoints*sizeof(gdPoint));
  };
  // Destructor to destroy this array
  ~gdPoint() {
    free(self);
  };
  // Python method for array access
  gdPoint *__getitem__(int i) {
    return self+i;
  };
};

FILE *fopen(char *, char *);
void fclose(FILE *f);
# Simple gd program

from gd import *

im = gdImageCreate(64,64)
black = gdImageColorAllocate(im,0,0,0)
white = gdImageColorAllocate(im,255,255,255)

pts = gdPoint(3);                   # Create an array of Points
pts[0].x,pts[0].y = (5,5)           # Assign a set of points
pts[1].x,pts[1].y = (60,25)
pts[2].x,pts[2].y = (16,60)

gdImagePolygon(im,pts,3,white)      # Draw a polygon from our array of points
out = fopen("test.gif","w")
gdImageGif(im,out)
fclose(out)
gdImageDestroy(im)
Our image class provides a number of methods for creating images, plotting points, making lines, and other graphical objects. We have also provided some methods for moving and scaling the image. Now, let's use this image class to do some interesting things :# image.py # Generic 2D Image Class # # Built using the 'gd-1.2' library by Thomas Boutell # import gd class Image: def __init__(self,width,height,xmin=0.0,ymin=0.0,xmax=1.0,ymax=1.0): self.im = gd.gdImageCreate(width,height) self.xmin = xmin self.ymin = ymin self.xmax = xmax self.ymax = ymax self.width = width self.height = height self.dx = 1.0*(xmax-xmin) self.dy = 1.0*(ymax-ymin) self.xtick = self.dx/10.0 self.ytick = self.dy/10.0 self.ticklen= 3 self.name = "image.gif" gd.gdImageColorAllocate(self.im,0,0,0) # Black gd.gdImageColorAllocate(self.im,255,255,255) # White gd.gdImageColorAllocate(self.im,255,0,0) # Red gd.gdImageColorAllocate(self.im,0,255,0) # Green gd.gdImageColorAllocate(self.im,0,0,255) # Blue def __del__(self): print "Deleting" gd.gdImageDestroy(self.im) # Dump out this image to a file def write(self,name="NONE"): if name == "NONE": name = self.name f = gd.fopen(name,"w") gd.gdImageGif(self.im,f) gd.fclose(f) self.name = name # Virtual method that derived classes define def draw(self): print "No drawing method specified." # A combination of write and draw def show(self,filename="NONE"): self.draw() self.write(filename) # Load up a colormap from a Python array of (R,G,B) tuples def colormap(self, cmap): for i in range(0,255): gd.gdImageColorDeallocate(self.im,i) for c in cmap: gd.gdImageColorAllocate(self.im,c[0],c[1],c[2]) # Change viewing region def region(self,xmin,ymin,xmax,ymax): self.xmin = xmin self.ymin = ymin self.xmax = xmax self.ymax = ymax self.dx = 1.0*(xmax-xmin) self.dy = 1.0*(ymax-ymin) # Transforms a 2D point into screen coordinates def transform(self,x,y): npt = [] ix = (x-self.xmin)/self.dx*self.width + 0.5 iy = (self.ymax-y)/self.dy*self.height + 0.5 return (ix,iy) # A few graphics primitives def clear(self,color): gd.gdImageFilledRectangle(self.im,0,0,self.width,self.height,color) def plot(self,x,y,color): ix,iy = self.transform(x,y) gd.gdImageSetPixel(self.im,ix,iy,color) def line(self,x1,y1,x2,y2,color): ix1,iy1 = self.transform(x1,y1) ix2,iy2 = self.transform(x2,y2) gd.gdImageLine(self.im,ix1,iy1,ix2,iy2,color) def box(self,x1,y1,x2,y2,color): ix1,iy1 = self.transform(x1,y1) ix2,iy2 = self.transform(x2,y2) gd.gdImageRectangle(self.im,ix1,iy1,ix2,iy2,color) def solidbox(self,x1,y1,x2,y2,color): ix1,iy1 = self.transform(x1,y1) ix2,iy2 = self.transform(x2,y2) gd.gdImageFilledRectangle(self.im,ix1,iy1,ix2,iy2,color) def arc(self,cx,cy,w,h,s,e,color): ix,iy = self.transform(cx,cy) iw = (x - self.xmin)/self.dx * self.width ih = (y - self.ymin)/self.dy * self.height gd.gdImageArc(self.im,ix,iy,iw,ih,s,e,color) def fill(self,x,y,color): ix,iy = self.transform(x,y) gd.gdImageFill(self,ix,iy,color) def axis(self,color): self.line(self.xmin,0,self.xmax,0,color) self.line(0,self.ymin,0,self.ymax,color) x = -self.xtick*(int(-self.xmin/self.xtick)+1) while x <= self.xmax: ix,iy = self.transform(x,0) gd.gdImageLine(self.im,ix,iy-self.ticklen,ix,iy+self.ticklen,color) x = x + self.xtick y = -self.ytick*(int(-self.ymin/self.ytick)+1) while y <= self.ymax: ix,iy = self.transform(0,y) gd.gdImageLine(self.im,ix-self.ticklen,iy,ix+self.ticklen,iy,color) y = y + self.ytick # scalex(s). Scales the x-axis. s is given as a scaling factor def scalex(self,s): xc = self.xmin + self.dx/2.0 dx = self.dx*s xmin = xc - dx/2.0 xmax = xc + dx/2.0 self.region(xmin,self.ymin,xmax,self.ymax) # scaley(s). Scales the y-axis. def scaley(self,s): yc = self.ymin + self.dy/2.0 dy = self.dy*s ymin = yc - dy/2.0 ymax = yc + dy/2.0 self.region(self.xmin,ymin,self.xmax,ymax) # Zooms a current image. s is given as a percent def zoom(self,s): s = 100.0/s self.scalex(s) self.scaley(s) # Move image left. s is given in range 0,100. 100 moves a full screen left def left(self,s): dx = self.dx*s/100.0 xmin = self.xmin + dx xmax = self.xmax + dx self.region(xmin,self.ymin,xmax,self.ymax) # Move image right. s is given in range 0,100. 100 moves a full screen right def right(self,s): self.left(-s) # Move image down. s is given in range 0,100. 100 moves a full screen down def down(self,s): dy = self.dy*s/100.0 ymin = self.ymin + dy ymax = self.ymax + dy self.region(self.xmin,ymin,self.xmax,ymax) # Move image up. s is given in range 0,100. 100 moves a full screen up def up(self,s): self.down(-s) # Center image def center(self,x,y): self.right(50-x) self.up(50-y)
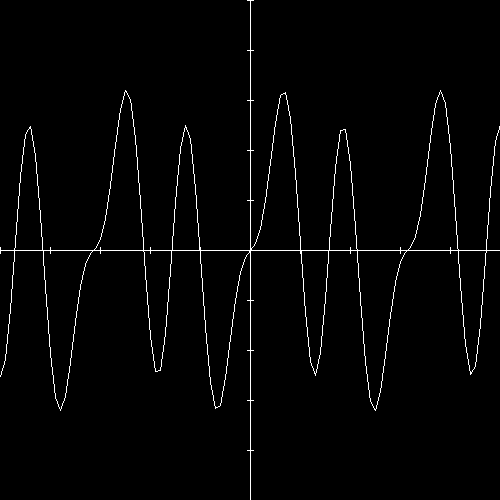
Most of the functionality is implemented in our base image class so this is pretty simple. However, if we wanted to make a GIF image of a mathematical function, we could just do this :# funcplot.py from image import * class PlotFunc(Image): def __init__(self,func,xmin,ymin,xmax,ymax,width=500,height=500): Image.__init__(self,width,height,xmin,ymin,xmax,ymax) self.func = func # The function being plotted self.npoints = 100 # Number of samples self.color = 1 def draw(self): self.clear(0) lastx = self.xmin lasty = self.func(lastx) dx = 1.0*(self.xmax-self.xmin)/self.npoints x = lastx+dx for i in range(0,self.npoints): y = self.func(x) self.line(lastx,lasty,x,y,self.color) lastx = x lasty = y x = x + dx self.axis(1)
>>> from funcplot import *
>>> import math
>>> p = PlotFunc(lambda x: 0.5*math.sin(x)+0.75*math.sin(2*x)-0.6*math.sin(3*x),
                 -10,-2,10,2)
>>> p.show("plot.gif")
This class simply reads the data into a few Python lists, has a drawing function for making a plot, and adds a special method for making triangles. Making a plot is now easy, just do this :# plotmesh.py # Plots an unstructured mesh stored as an ASCII file from image import * import string class PlotMesh(Image): def __init__(self,filename,xmin,ymin,xmax,ymax,width=500,height=500): Image.__init__(self,width,height,xmin,ymin,xmax,ymax) # read in a mesh file in pieces pts = [] # Read in data points atoi = string.atoi atof = string.atof f = open(filename+".pts","r") npoints = atoi(f.readline()) for i in range(0,npoints): l = string.split(f.readline()) pts.append((atof(l[0]),atof(l[1]))) f.close() # Read in mesh data f = open(filename+".tris","r") ntris = string.atoi(f.readline()) tris = [ ] for i in range(0,ntris): l = string.split(f.readline()) tris.append((atoi(l[0])-1,atoi(l[1])-1,atoi(l[2])-1,atoi(l[3]))) f.close() # Set up local attributes self.pts = pts self.npoints = npoints self.tris = tris self.ntris = ntris # Draw mesh def draw(self): self.clear(0); i = 0 while i < self.ntris: tri = self.tris[i] pt1 = self.pts[tri[0]] pt2 = self.pts[tri[1]] pt3 = self.pts[tri[2]] # Now draw the mesh self.triangle(pt1[0],pt1[1],pt2[0],pt2[1],pt3[0],pt3[1],tri[3]); i = i + 1 # Draw a triangle def triangle(self,x1,y1,x2,y2,x3,y3,color): self.line(x1,y1,x2,y2,color) self.line(x2,y2,x3,y3,color) self.line(x3,y3,x1,y1,color)
>>> from plotmesh.py import *
>>> mesh = PlotMesh("mesh",5,0,35,25)
>>> mesh.show("mesh.gif")
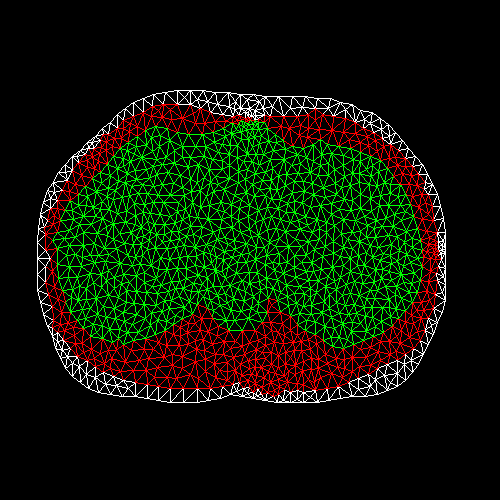
When run interactively, we can also use simple commands to zoom in and move the image around. For example :
>>> mesh = PlotMesh("mesh",5,0,35,25)
>>> mesh.zoom(200)                   # Enlarge by 200%
>>> mesh.left(50)                    # Move image half a screen to left
>>> mesh.show()
>>>
While a Python-only implementation would be unsuitable for huge datasets, performance critical operations could be moved to C and used in conjunction with our Image base class.
%module package
%include pde.i
%include gd.i
This will combine everything in both interface files into a single super-module called "package". The advantage to this approach is that it is extremely quick and easy. The disadvantage is that the module names of "pde" and "gd" will be lost. If you had a bunch of scripts that relied on those names, they would no longer work. Thus, combining modules in this way is probably only a good idea if the modules are closely related.
This will build a static version of Python with 3 C extension modules added (package, pdec, and gdc). When using this technique, the names of the modules refer to the low-level SWIG generated C/C++ modules. Since shadow classes are being used, these modules must have an extra `c' appended to the name (thus, "pdec" and "gdc" instead of "pde" and "gd"). The extra modules specified with the %modules directive do not necessarily have to be SWIG-generated modules. In practice, almost any kind of Python module can be listed here. It should also be noted that extra modules names are completely ignored if the embed.i library file is not used.%module package, pdec, gdc %include embed.i
swigpy is a special purpose library that contains the SWIG pointer type checker and other support code (see the Misc subdirectory of the SWIG distribution). When used in this manner, the same support code will be used for all of the modules. The swigpy library can also be applied when static linking is being used. See the Advanced Topics chapter for more information about using SWIG with multiple modules.% swig -c -python graphics.i % swig -c -python network.i % swig -c -python analysis.i % swig -c -python math.i % gcc -c graphics_wrap.c network_wrap.c analysis_wrap.c math_wrap.c % ld -shared graphics_wrap.o -lswigpy -o graphicsmodule.so % ld -shared network_wrap.o -lswigpy -o networkmodule.so % ld -shared analysis_wrap.o -lswigpy -o analysismodule.so % ld -shared math_wrap.o -o -lswigpy mymathmodule.so
# Solve the heat equation.
# Make a series of data files
# Make a movie of GIF images

from pde import *
from image import *
import string

# Image class
class HeatImg(Image):
	def __init__(self,h,width=300,height=300):
		Image.__init__(self,width,height,0.0,0.0,1.0,1.0)
		self.h = h
		# Create a greyscale colormap
		cmap = []
		for i in range(0,255):
			cmap.append((i,i,i))
		self.colormap(cmap)
		self.cmin = 0.0
		self.cmax = 1.0
		self.imgno = 1
	def draw(self):
		self.clear(0)
		dx = 1.0/(self.h.grid.xpoints-2)
		dy = 1.0/(self.h.grid.ypoints-2)
		i = 1
		x = 0.0
		while i < self.h.grid.xpoints:
			j = 1;
			y = 0.0
			while j < self.h.grid.ypoints:
				c = int((self.h.grid[i][j]-self.cmin)/(self.cmax-
					 self.cmin)*255)
				self.solidbox(x,y+dy,x+dx,y,c)
				j = j + 1
				y = y + dy
			i = i + 1
			x = x + dx
		self.name = "image"+string.zfill(self.imgno,4)+".gif"
		self.imgno = self.imgno+1

# Set up an initial condition
def initcond(h):
	h.set_temp(0.0)
	nx = h.grid.xpoints
	for i in range(0,nx):
		h.grid[i][0] = 1.0

# Set up a problem and run it
h = Heat2d(50,50)

# Make an image object
img = HeatImg(h)

initcond(h)
fileno = 1

# Run it
for i in range(0,25):
	h.solve(100)
	h.dump("Dat"+str(fileno))
	img.show()
	print "time = ", h.time
	fileno = fileno+1

# Calculate average temperature and exit
sum = 0.0
for i in range(0,h.grid.xpoints):
	for j in range(0,h.grid.ypoints):
		sum = sum + h.grid[i][j]
avg = sum/(h.grid.xpoints*h.grid.ypoints)
print "Avg temperature = ",avg
When run, we now get a collection of datafiles and series of images like this :

Thus, we have a simple physics application that only takes about 1 page of Python code, runs a simulation, creates data files, and a movie of images. We can easily change any aspect of the simulation, interactively query variables and examine data. New procedures can be written and tested in Python and later implemented in C++ if needed. More importantly, we have an application that is actually fun to use and modify (well, at least I think so).
class RangeError {};   // Used for an exception

class DoubleArray {
  private:
    int n;
    double *ptr;
  public:
    // Create a new array of fixed size
    DoubleArray(int size) {
      ptr = new double[size];
      n = size;
    }
    // Destroy an array
    ~DoubleArray() {
       delete ptr;
    }
    // Return the length of the array
    int   length() {
      return n;
    }

    // Get an item from the array and perform bounds checking.
    double getitem(int i) {
      if ((i >= 0) && (i < n))
        return ptr[i];
      else
        throw RangeError();
    }

    // Set an item in the array and perform bounds checking.
    void setitem(int i, double val) {
      if ((i >= 0) && (i < n))
        ptr[i] = val;
      else {
        throw RangeError();
      }
    }
  };
The functions associated with this class can throw a range exception for an out-of-bounds array access. We can catch this in our Python extension by specifying the following in an interface file :
%except(python) {
  try {
    $function
  }
  catch (RangeError) {
    PyErr_SetString(PyExc_IndexError,"index out-of-bounds");
    return NULL;
  }
}
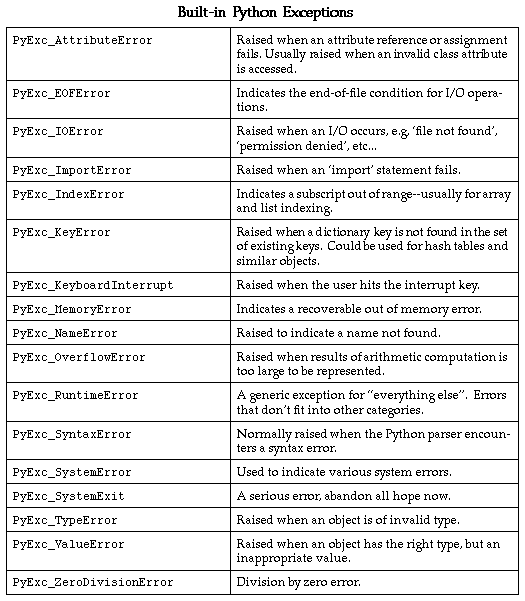
Python exceptions can be raised using the PyErr_SetString() function as shown above. The following table provides a list of the different Python exceptions available.
%module example

%typemap(python,in) int {
	$target = (int) PyLong_AsLong($source);
	printf("Received an integer : %d\n",$target);
}
extern int fact(int n);
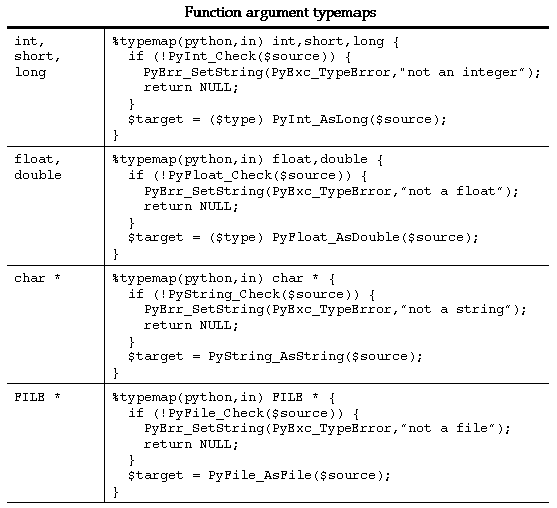
Typemaps require a language name, method name, datatype, and conversion code. For Python, "python" should be used as the language name. The "in" method in this example refers to an input argument of a function. The datatype `int' tells SWIG that we are remapping integers. The supplied code is used to convert from a PyObject * to the corresponding C datatype. Within the supporting C code, the variable $source contains the source data (the PyObject in this case) and $target contains the destination of a conversion.
When this example is compiled into a Python module, it will operate as follows :
>>> from example import *
>>> fact(6)
Received an integer : 6
720
A full discussion of typemaps can be found in the main SWIG users reference. We will primarily be concerned with Python typemaps here.
%typemap(python,in) Converts Python objects to input function arguments
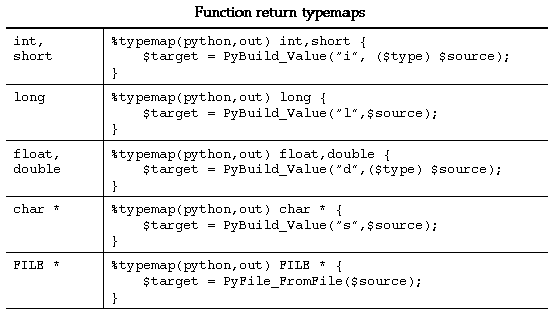
%typemap(python,out) Converts return value of a C function to a Python object
%typemap(python,varin) Assigns a global variable from a Python object
%typemap(python,varout) Returns a global variable as a Python object
%typemap(python,freearg) Cleans up a function argument (if necessary)
%typemap(python,argout) Output argument processing
%typemap(python,ret) Cleanup of function return values
%typemap(python,const) Creation of Python constants
%typemap(memberin) Setting of C++ member data
%typemap(memberout) Return of C++ member data
%typemap(python,check) Checks function input values.
$source Source value of a conversion
$target Target of conversion (where the result should be stored)
$type C datatype being remapped
$mangle Mangled version of data (used for pointer type-checking)
$value Value of a constant (const typemap only)
%module foo

// This typemap will be applied to all char ** function arguments
%typemap(python,in) char ** { ... }

// This typemap is applied only to char ** arguments named `argv'
%typemap(python,in) char **argv { ... }
Due to the name-based nature of typemaps, it is important to note that typemaps are independent of typedef declarations. For example :
%typemap(python, in) double {
	... get a double ...
}
void foo(double);            // Uses the above typemap
typedef double Real;
void bar(Real);              // Does not use the above typemap (double != Real)
%typemap(python,in) double {
	... get a double ...
}
void foo(double);

typedef double Real;         // Uses typemap
%apply double { Real };      // Applies all "double" typemaps to Real.
void bar(Real);              // Now uses the same typemap.
%module argv
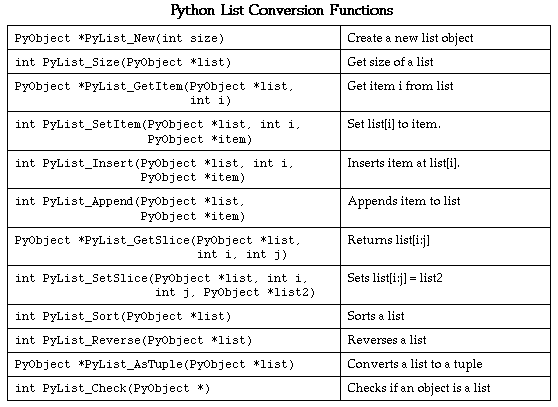
// This tells SWIG to treat char ** as a special case
%typemap(python,in) char ** {
/* Check if is a list */
if (PyList_Check($source)) {
int size = PyList_Size($source);
int i = 0;
$target = (char **) malloc((size+1)*sizeof(char *));
for (i = 0; i < size; i++) {
PyObject *o = PyList_GetItem($source,i);
if (PyString_Check(o))
$target[i] = PyString_AsString(PyList_GetItem($source,i));
else {
PyErr_SetString(PyExc_TypeError,"list must contain strings");
free($target);
return NULL;
}
}
$target[i] = 0;
} else {
PyErr_SetString(PyExc_TypeError,"not a list");
return NULL;
}
}
// This cleans up the char ** array we malloc'd before the function call
%typemap(python,freearg) char ** {
free((char *) $source);
}
// This allows a C function to return a char ** as a Python list
%typemap(python,out) char ** {
int len,i;
len = 0;
while ($source[len]) len++;
$target = PyList_New(len);
for (i = 0; i < len; i++) {
PyList_SetItem($target,i,PyString_FromString($source[i]));
}
}
// Now a few test functions
%inline %{
int print_args(char **argv) {
int i = 0;
while (argv[i]) {
printf("argv[%d] = %s\n", i,argv[i]);
i++;
}
return i;
}
// Returns a char ** list
char **get_args() {
static char *values[] = { "Dave", "Mike", "Susan", "John", "Michelle", 0};
return &values[0];
}
%}
Our type-mapping makes the Python interface to these functions more natural and easy to use.>>> from argv import * >>> print_args(["Dave","Mike","Mary","Jane","John"]) argv[0] = Dave argv[1] = Mike argv[2] = Mary argv[3] = Jane argv[4] = John 5 >>> get_args() [`Dave', `Mike', `Susan', `John', `Michelle'] >>>
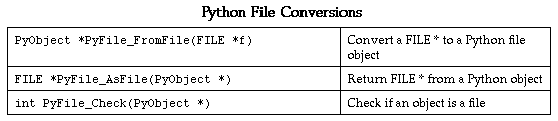
// Type mapping for grabbing a FILE * from Python

%typemap(python,in) FILE * {
  if (!PyFile_Check($source)) {
      PyErr_SetString(PyExc_TypeError, "Need a file!");
      return NULL;
  }
  $target = PyFile_AsFile($source);
}
Now, we can rewrite one of our earlier examples like this :
# Simple gd program

from gd import *

im = gdImageCreate(64,64)
black = gdImageColorAllocate(im,0,0,0)
white = gdImageColorAllocate(im,255,255,255)
gdImageLine(im,0,0,63,63,white)
f = open("test.gif","w")               # Create a Python file object
gdImageGif(im,f)                       # Pass to a C function as FILE *
f.close()
gdImageDestroy(im)
/* Returns a status value and two values in out1 and out2 */
int spam(double a, double b, double *out1, double *out2) {
	... Do a bunch of stuff ...
	*out1 = result1;
	*out2 = result2;
	return status;
};
%module outarg

// This tells SWIG to treat an double * argument with name 'OutValue' as
// an output value.  We'll append the value to the current result which
// is guaranteed to be a List object by SWIG.

%typemap(python,argout) double *OutValue {
	PyObject *o;
	o = PyFloat_FromDouble(*$source);
	if ((!$target) || ($target == Py_None)) {
		$target = o;
	} else {
		if (!PyList_Check($target)) {
			PyObject *o2 = $target;
			$target = PyList_New(0);
			PyList_Append($target,o2);
			Py_XDECREF(o2);
		}
		PyList_Append($target,o);
		Py_XDECREF(o);
	}
}
int spam(double a, double b, double *OutValue, double *OutValue);
%typemap(python,ignore) double *OutValue(double temp) {
	$target = &temp;       /* Assign the pointer to a local variable */
}
>>> a = spam(4,5)
>>> print a
[0, 2.45, 5.0]
>>>
extern void set_direction(double a[4]); // Set direction vector
This too, can be handled used typemaps as follows :
// Grab a 4 element array as a Python 4-tuple
%typemap(python,in) double[4](double temp[4]) {   // temp[4] becomes a local variable
  int i;
  if (PyTuple_Check($source)) {
    if (!PyArg_ParseTuple($source,"dddd",temp,temp+1,temp+2,temp+3)) {
      PyErr_SetString(PyExc_TypeError,"tuple must have 4 elements");
      return NULL;
    }
    $target = &temp[0];
  } else {
    PyErr_SetString(PyExc_TypeError,"expected a tuple.");
    return NULL;
  }
}
Since our mapping copies the contents of a Python tuple into a C array, such an approach would not be recommended for huge arrays, but for small structures, this kind of scheme works fine.>>> set_direction((0.5,0.0,1.0,-0.25))
#define NAMELEN   32
typedef struct {
	char   name[NAMELEN];
	...
} Person;
%typemap(memberin) char[NAMELEN] {
	/* Copy at most NAMELEN characters into $target */
	strncpy($target,$source,NAMELEN);
}
It should be noted that the [NAMELEN] array size is attached to the typemap. A datatype involving some other kind of array would not be affected. However, you can write a typemap to match any sized array using the ANY keyword as follows :
%typemap(memberin) char [ANY] {
	strncpy($target,$source,$dim0);
}
During code generation, $dim0 will be filled in with the real array dimension.


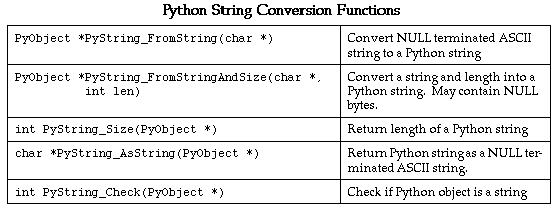
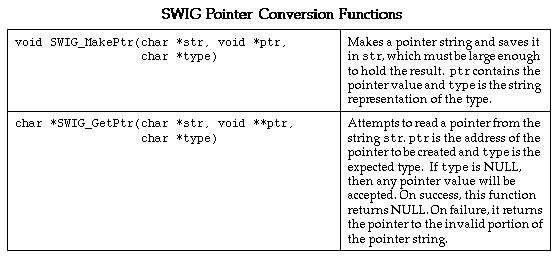
These functions can be used in typemaps. For example, the following typemap makes an argument of "char *buffer" accept a pointer instead of a NULL-terminated ASCII string.
%typemap(python,in) char *buffer {
	PyObject *o;
	char     *str;
	if (!PyString_Check(o)) {
		PyErr_SetString(PyExc_TypeError,"not a string");
		return NULL;
	}
	str = PyString_AsString(o);
	if (SWIG_GetPtr(str, (void **) &$target, "$mangle")) {
		PyErr_SetString(PyExc_TypeError,"not a pointer");
		return NULL;
	}
}
By now you hopefully have the idea that typemaps are a powerful mechanism for building more specialized applications. While writing typemaps can be technical, many have already been written for you. See the Typemaps chapter for more information about using library files.
Let's say that we wanted to write a simple C++ 2D plotting widget layered on top of the gd-1.2 library. A class definition might look like this :
// --------------------------------------------------------------------
// Create a C++ plotting "widget" using the gd-1.2 library by Thomas Boutell
//
// This example primarily illustrates how callback functions can be
// implemented in Python.
// --------------------------------------------------------------------

#include <stdio.h>
extern "C" {
#include "gd.h"
}

typedef double (*PLOTFUNC)(double, void *);

class PlotWidget {
private:
  double      xmin,ymin,xmax,ymax;         // Plotting range
  PLOTFUNC    callback;                    // Callback function
  void       *clientdata;                  // Client data for callback
  int         npoints;                     // Number of points to plot
  int         width;                       // Image width
  int         height;                      // Image height
  int         black,white;                 // Some colors
  gdImagePtr  im;                          // Image pointer
  void        transform(double,double,int&,int&);
public:
  PlotWidget(int w, int h,double,double,double,double);
  ~PlotWidget();
  void set_method(PLOTFUNC func, void *clientdata);    // Set callback method
  void set_range(double,double,double,double);         // Set plot range
  void set_points(int np) {npoints = np;}              // Set number of points
  void plot();                                         // Make a plot
  void save(FILE *f);                                  // Save a plot to disk
};
// Simple main program to test out our widget
#include <stdio.h>
#include "widget.h"
#include <math.h>

// Callback function
double my_func(double a, void *clientdata) {
  return sin(a);
}

int main(int argc, char **argv) {
  PlotWidget *w;
  FILE *f;

  w = new PlotWidget(500,500,-6.3,-1.5,6.3,1.5);
  w->set_method(my_func,0);              // Set callback function
  w->plot();                             // Make plot
  f = fopen("plot.gif","w");
  w->save(f);
  fclose(f);
  printf("wrote plot.gif\n");
}
// SWIG interface to our PlotWidget
%module plotwidget
%{
#include "widget.h"
%}

// Grab a Python function object as a Python object.
%typemap(python,in) PyObject *pyfunc {
  if (!PyCallable_Check($source)) {
      PyErr_SetString(PyExc_TypeError, "Need a callable object!");
      return NULL;
  }
  $target = $source;
}

// Type mapping for grabbing a FILE * from Python
%typemap(python,in) FILE * {
  if (!PyFile_Check($source)) {
      PyErr_SetString(PyExc_TypeError, "Need a file!");
      return NULL;
  }
  $target = PyFile_AsFile($source);
}

// Grab the class definition
%include widget.h

%{
/* This function matches the prototype of the normal C callback
   function for our widget. However, we use the clientdata pointer
   for holding a reference to a Python callable object. */

static double PythonCallBack(double a, void *clientdata)
{
   PyObject *func, *arglist;
   PyObject *result;
   double    dres = 0;

   func = (PyObject *) clientdata;               // Get Python function
   arglist = Py_BuildValue("(d)",a);             // Build argument list
   result = PyEval_CallObject(func,arglist);     // Call Python
   Py_DECREF(arglist);                           // Trash arglist
   if (result) {                                 // If no errors, return double
     dres = PyFloat_AsDouble(result);
   }
   Py_XDECREF(result);
   return dres;
}
%}

// Attach a new method to our plot widget for adding Python functions
%addmethods PlotWidget {
   // Set a Python function object as a callback function
   // Note : PyObject *pyfunc is remapped with a typempap
   void set_pymethod(PyObject *pyfunc) {
     self->set_method(PythonCallBack, (void *) pyfunc);
     Py_INCREF(pyfunc);
   }
}
# Now use our plotting widget in variety of ways

from plotwidget import *
from math import *

# Make a plot using a normal Python function as a callback
def func1(x):
	return 0.5*sin(x)+0.25*sin(2*x)+0.125*cos(4*x)

print "Making plot1.gif..."
# Make a widget and set callback
w = PlotWidget(500,500,-10,-2,10,2)
w.set_pymethod(func1)                     # Register our Python function
w.plot()
f = open("plot1.gif","w")
w.save(f)
f.close()

# Make a plot using an anonymous function

print "Making plot2.gif..."
w1 = PlotWidget(500,500,-4,-1,4,16)
w1.set_pymethod(lambda x: x*x)            # Register x^2 as a callback
w1.plot()
f = open("plot2.gif","w")
w1.save(f)
f.close()

# Make another plot using a built-in function

print "Making plot3.gif..."
w2 = PlotWidget(500,500,-7,-1.5,7,1.5)
w2.set_pymethod(sin)                      # Register sin(x) as a callback
w2.plot()
f = open("plot3.gif","w")
w2.save(f)
f.close()
The "plot" method for each widget is written entirely in C++ and assumes that it is calling a callback function written in C/C++. Little does it know that we have actually implemented this function in Python. With a little more work, we can even write a simple function plotting tool :
# Plot a function and spawn xv

import posix
import sys
import string
from plotwidget import *
from math import *

line = raw_input("Enter a function of x : ")
ranges = string.split(raw_input("Enter xmin,ymin,xmax,ymax :"),",")

print "Making a plot..."
w = PlotWidget(500,500,string.atof(ranges[0]),string.atof(ranges[1]),
               string.atof(ranges[2]),string.atof(ranges[3]))

# Turn user input into a Python function
code = "def func(x): return " + line
exec(code)

w.set_pymethod(func)
w.plot()
f = open("plot.gif","w")
w.save(f)
f.close()
posix.system("xv plot.gif &")
PyObject *spam_system(PyObject *self, PyObject *args) {
	char *command;
	int sts;
	if (!PyArg_ParseTuple(args,"s",&command))
		return NULL;
	sts = system(command);
	return Py_BuildValue("i",sts);
}
Alternatively, you can use the full function declaration like this%native(system) spam_system; // Create a command called `system'
%native(system) PyObject *spam_system(PyObject *self, PyObject *args);
or
%native(system) extern PyObject *spam_system(PyObject *self, PyObject *args);
%module pde
struct Grid2d {
  Grid2d(int ni, int nj);
  ~Grid2d();
  double **data;
  int      xpoints;
  int      ypoints;
};
The SWIG generated class for this structure looks like the following :
# This file was created automatically by SWIG.
import pdec
class Grid2dPtr :
    def __init__(self,this):
        self.this = this
        self.thisown = 0
    def __del__(self):
        if self.thisown == 1 :
            pdec.delete_Grid2d(self.this)
    def __setattr__(self,name,value):
        if name == "data" :
            pdec.Grid2d_data_set(self.this,value)
            return
        if name == "xpoints" :
            pdec.Grid2d_xpoints_set(self.this,value)
            return
        if name == "ypoints" :
            pdec.Grid2d_ypoints_set(self.this,value)
            return
        self.__dict__[name] = value
    def __getattr__(self,name):
        if name == "data" :
            return pdec.Grid2d_data_get(self.this)
        if name == "xpoints" :
            return pdec.Grid2d_xpoints_get(self.this)
        if name == "ypoints" :
            return pdec.Grid2d_ypoints_get(self.this)
        return self.__dict__[name]
    def __repr__(self):
        return "<C Grid2d instance>"
class Grid2d(Grid2dPtr):
    def __init__(self,arg0,arg1) :
        self.this = pdec.new_Grid2d(arg0,arg1)
        self.thisown = 1
The Grid2d class, on the other hand, is used when you want to create a new Grid2d object from Python. In reality, it inherits all of the attributes of a Grid2dPtr, except that its constructor calls the corresponding C++ constructor to create a new object. Thus, in Python, this would look something like the following :>>> gptr = create_grid2d() # Returns a Grid2d from somewhere >>> g = Grid2dPtr(gptr) # Turn it into a Python class >>> g.xpoints 50 >>>
This two class model is a tradeoff. In order to support C/C++ properly, it is necessary to be able to create Python objects from both pre-existing C++ objects and to create entirely new C++ objects in Python. While this might be accomplished using a single class, it would complicate the handling of constructors considerably. The two class model, on the other hand, works, is consistent, and is relatively easy to use. In practice, you probably won't even be aware that there are two classes working behind the scenes.>>> g = Grid2d(50,50) # Create a new Grid2d >>> g.xpoints 50 >>>
>>> g = Grid2d(50,50)
>>> print g.this
_1008fe8_Grid2d_p
>>>
Direct manipulation of the "this" pointer is generally discouraged. In fact forget that you read this.
Ownership of an object can be changed as necessary by changing the value of thisown. When set, Python will call the C/C++ destructor when the object is deleted. If it is zero, Python will never call the C/C++ destructor.
%module vector
struct Vector {
	Vector();
	~Vector();
	double x,y,z;
};

Vector addv(Vector a, Vector b);
Function arguments are modified to use the "this" pointer of a Python Vector object. The result is a pointer to the result which has been allocated by malloc or new (this behavior is described in the chapter on SWIG basics), so we simply create a new VectorPtr with the return value. Since the result involved an implicit malloc, we set the ownership to 1 indicating that the result is to be owned by Python and that it should be deleted when the Python object is deleted. As a result, operations like this are perfectly legal and result in no memory leaks :def addv(a,b): result = VectorPtr(vectorc.addv(a.this,b.this)) result.thisown = 1 return result
Substitution of complex datatypes occurs for all functions and member functions involving structure or class definitions. It is rarely necessary to use the low-level C interface when working with shadow classes.>>> v = add(add(add(add(a,b),c),d),e)
%module particle

typedef struct {
  Vector();
  double x,y,z;
} Vector;

typedef struct {
  Particle();
 ~Particle();
  Vector r;
  Vector v;
  Vector f;
  int    type;
} Particle;
In this case you will be able to access members as follows :
Nesting of objects is implemented using Python's __setattr__ and __getattr__ functions. In this case, they would look like this :>>> p = Particle() >>> p.r.x = 0.0 >>> p.r.y = -1.5 >>> p.r.z = 2.0 >>> p.v = addv(v1,v2) >>> ...
The attributes of any given object are only converted into a Python object when referenced. This approach is more memory efficient, faster if you have a large collection of objects that aren't examined very often, and works with recursive structure definitions such as :class ParticlePtr: ... def __getattr__(self,name): if name == "r": return particlec.VectorPtr(Particle_r_get(self.this)) elif name == "v": return particlec.VectorPtr(Particle_v_get(self.this)) ... def __setattr__(self,name,value): if name == "r": particlec.Particle_r_set(self.this,value.this) elif name == "v": particlec.Particle_v_set(self.this,value.this) ...
struct Node {
	char *name;
	struct Node *next;
};
Nested structures such as the following are also supported by SWIG. These types of structures tend to arise frequently in database and information processing applications.
typedef struct {
	unsigned int dataType;
	union {
		int       intval;
		double    doubleval;
		char     *charval;
		void     *ptrvalue;
		long      longval;
		struct {
			int    i;
			double f;
			void   *v;
			char name[32];
              } v;
	} u;
} ValueStruct;
To support the embedded structure definitions, SWIG has to extract the internal structure definitions and use them to create new Python classes. In this example, the following shadow classes are created :>>> v = new_ValueStruct() # Create a ValueStruct somehow >>> v.dataType 1 >>> v.u.intval 45 >>> v.u.longval 45 >>> v.u.v.v = _0_void_p >>>
# Class corresponding to union u member
class ValueStruct_u :
	...
# Class corresponding to struct v member of union u
class ValueStruct_u_v :
	...
The names of the new classes are formed by appending the member names of each embedded structure.
Vector *cross_product(Vector *v1, Vector *v2) {
	Vector *result = new Vector();
	result = ... compute cross product ...
	return result;
}
Unfortunately, this is ugly and it doesn't work if we use the result as a temporary value :>>> v = cross_product(a,b) >>> v.thisown = 1 # Now Python owns it
w = vector_add(cross_product(a,b),c) # Results in a memory leak
However, you can provide a hint to SWIG when working with such a function as shown :
The %new directive only provides a hint that the function is returning a new object. The Python module will assign proper ownership of the object when this is used.// C Function returning a new object %new Vector *cross_product(Vector *v1, Vector *v2);
There are a number of ways to optimize programs that use shadow classes. Consider the following two code fragments involving the Particle data structure in a previous example :
The first calculation simply works with each Particle structure directly. Unfortunately, it performs alot of dereferencing of objects. If the calculation is restructured to use temporary variables as shown in force2, it will run significantly faster--in fact, on my machine, the second code fragment runs more than twice as fast as the first one.def force1(p1,p2): dx = p2.r.x - p1.r.x dy = p2.r.y - p1.r.y dz = p2.r.z - p1.r.z r2 = dx*dx + dy*dy + dz*dz f = 1.0/(r2*math.sqrt(r2)) p1.f.x = p1.f.x + f*dx p2.f.x = p2.f.x - f*dx p1.f.y = p1.f.y + f*dy p2.f.y = p2.f.y - f*dy p1.f.z = p1.f.z + f*dz p2.f.z = p2.f.z - f*dz def force2(p1,p2): r1 = p1.r r2 = p2.r dx = r2.x - r1.x dy = r2.y - r1.y dz = r2.z - r1.z r2 = dx*dx + dy*dy + dz*dz f = 1.0/(r2*math.sqrt(r2)) f1 = p1.f f2 = p2.f f1.x = f1.x + f*dx f2.x = f2.x - f*dx f1.y = f1.y + f*dy f2.y = f2.y - f*dy f1.z = f1.z + f*dz f2.z = f2.z - f*dz
If performance is even more critical you can use the low-level C interface which eliminates all of the overhead of going through Python's class mechanism (at the expense of coding simplicity). When Python shadow classes are used, the low level C interface can still be used by importing the `modulec' module where `module' is the name of the module you used in the SWIG interface file.